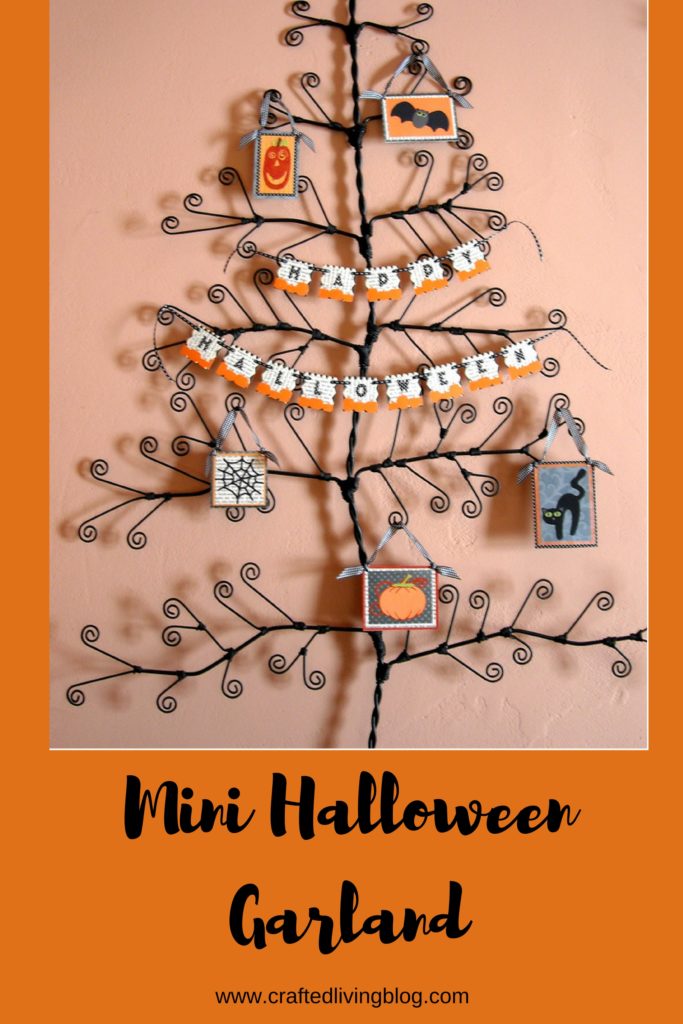
The holidays are upon us and Halloween is just around the corner. This Mini Halloween Garland is charming and can be displayed in tight spaces like your office or cubicle or anywhere you want to decorate your personal space for Halloween.
Gather the following tools and supplies to create the Mini Halloween Garland:
(These next 4 links are affiliate links which means I get a commission if you purchase through me.)
- Ultimate Card Making Tool Kit
- Creative Memories Border Maker and Pumpkins Border Maker Cartridge
- Cricut Chic and Scary cartridge
- alphabet die
- 1.5″ square punch and 1.25″ square punch
- mini hole punch
- old book paper
- Halloween patterned paper
- thin chipboard (cereal boxes are a nice alternative)
- ribbon
- colored cardstock
- tape runner and mini tape runner
- glue pen
- Cut Halloween using the die and Cuttlebug.
- Cut several pumpkins borders using the Border Maker.
- Punch out 14 squares each out of patterned paper and old book paper using both square punches.
- Adhere smaller squares to larger squares using the tape runner. Trim pumpkin border to punched squares and adhere to the bottom using the mini tape runner. Adhere Halloween letters to each square using the glue pen.
- Punch holes in the upper corner of each square and thread ribbon to make the mini garland.
- Decorative panels vary in size depending on which image you choose. To create each one, cut out the image using the Cricut and assemble using an appropriate adhesive. Create a layered effect by mixing patterned papers and book paper to frame each panel. Adhere layers together and then adhere to the chipboard using the tape runner. Punch holes in the upper corner of each panel and thread ribbon to make a hanger.
- Hang your Mini Halloween Garland masterpiece.

I made this Mini Halloween Garland five years ago and it still looks brand new. It is worth the effort to make this type of decoration because you can display it every year for years to come. This project can be a scrap buster too as I used many papers from my stash to create it. That is part of the fun, mixing and matching, using what you have. Embrace your creativity and create your own Halloween masterpiece. The same images for this garland can also be found on the Halloween Paper Ribbon Wreath.
Meet me back here for more Halloween goodness as you still have time to create and decorate. Be creative!

Editor’s note: I created this mini garland using the Creative Memories Cheerful Seasons cartridge (pumpkin with vine), Creative Memories This & That cartridge (bat, black cat, and spider web), and Cricut Stretch Your Imagination (jack o’ lantern). The Chic and Scary cartridge is a suitable alternative. I also used We R Memory Keepers Manhattan alphabet die that is no longer available. The letters measured 5/8″ tall for your reference.
I would like to have the tree.
I’m glad that you like the tree. I purchased it years ago from Pottery Barn and it’s no longer available. I hope you find one that you like just as much. Good luck!